How to set your rideshare filters in rural and suburban areas
Learn how to set pickup distance, total $/mi, and drop-off filters.

Most filter advice is built for busy cities. If you drive in the suburbs or out in the country, that advice leaves you parked and waiting. This week, driver and Mystro contributor Thortok walks through the setup he uses when offers are scarce.
The first thing I would recommend to a driver who’s found themselves in an area or time with low offer density is to go seek higher offer density (Mystro’s heatmaps can help). But what if that’s not an option? Money still has to be made.
In suburban or rural areas, or anywhere or any time with low offer density, your ‘cherry-picking’ strategy changes shape. It becomes less about finding the ripe ones and more about tossing out the spoiled ones.
In a rural setting, when offer density is to the point of being breadcrumbs, a “spoiled” offer is going to be one that costs you more (or almost more) than you earn by doing it.
So the main differences your filters will see (compared to an urban or highly dense offer environment) are a relaxed constraint on pickup distance, and a tighter constraint on $/mi and drop-off location. You may also need to relax your $/hr goals as well.
Let’s break it down.
Why city filter settings don't work in the suburbs
Filters intended for high offer density assume that it won’t take long to get a good offer, so you can afford to skip most of them and just take the best. Reject an offer? Accidentally take a bad trip? Either way, more offers are reliably headed your way.
But when you’re in suburban or rural areas, offers come fewer and farther between. It takes a while just to get an offer at all, much less a good one. And every minute that ticks by when you’re not driving a trip is a big fat $0 in your earnings. (Not even counting your maintenance and gas costs.)
In a city, with high offer density, those $0 minutes are scarce. In the country, it’s the trips that are scarce. The entire model flips. So your filters need to flip, too.
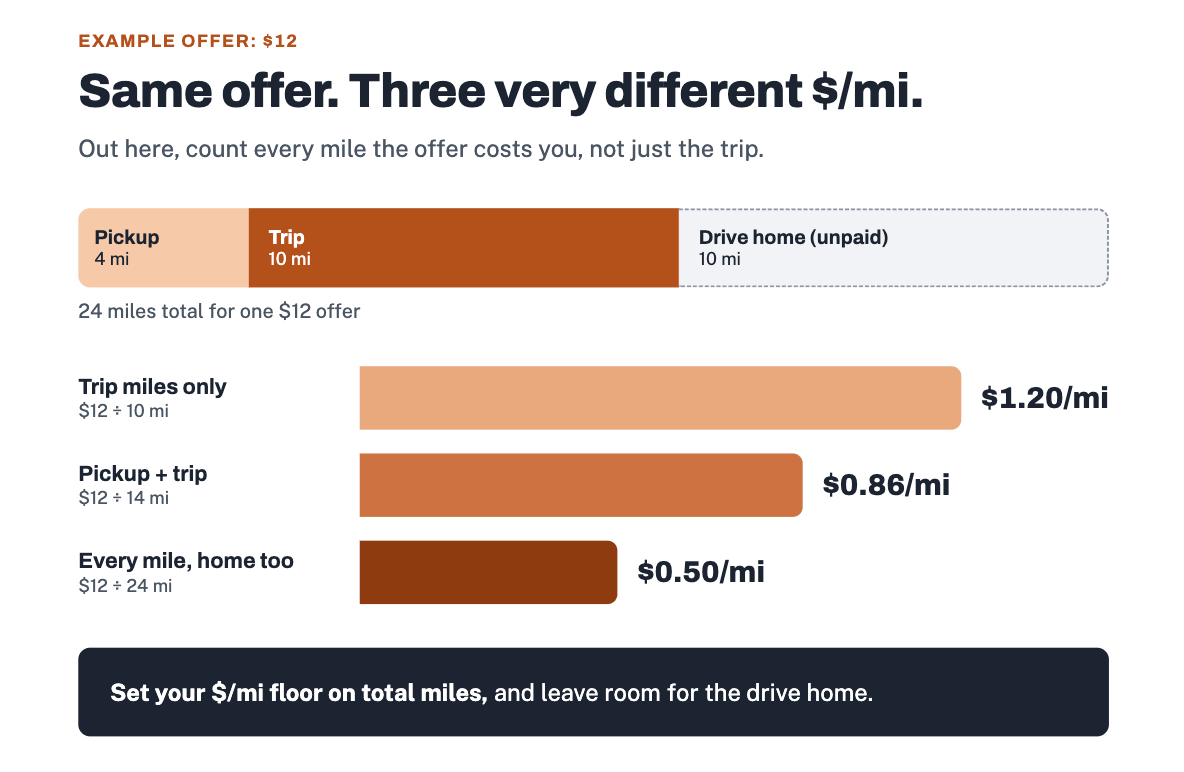
Without that offer density to lean on, price every offer as if the drive home will be unpaid deadhead. Because it probably will be.
The three filters that matter most outside the city
Three filters change the most once you leave the city:
Pickup distance (or time): Pickup distance needs to get looser, because offers are scarce and a long pickup beats no offer at all.
$/mi: $/mi gets tighter, because every offer has to cover the empty miles you'll likely drive back
Drop-off location: drop-off location decides where your next offer comes from, or whether one comes at all.
In the city, a bad drop-off costs you a few minutes. In the burbs, it can cost you the rest of your shift.
How far is too far for a suburban pickup?
In a city, you keep pickups short so you stay where the offers are. In the country, you need to loosen this up. You might even turn this filter completely off.
I would recommend that your ‘accept’ filter for pickup time stays at perhaps half an hour, but to not have this in your ‘reject’ filters. That way you can manually review the ones that have more than half an hour pickup. If your pickup alone is already over 30 minutes, at that point your trip is getting so long that not having a filter here means you're instantly/automatically committing to a huge chunk of time that may go outside your actual availability.
Combined with a similar size trip time filter, the longest trip you'll automatically accept is about an hour. Anything more than that, it's better that you give a manual yes (if you want it) instead of an automatic one.
I recommend 40 minutes for the trip and 30 minutes for the pickup because I’ve never personally seen a pickup more than 30 minutes anyway, but I have seen some long trips before, and putting the trip time at 30 minutes kept giving me offers to manually accept that I was fine with, so I pushed it up to 40 to automatically accept the ‘not extremely long’ trips more frequently.
Why does $/mi matter more than $/hr outside the city?
You’ll want to set $/mi higher than you would in the city, because of the higher amount of deadhead miles you’re likely to get.
But how higher is “higher”? Here’s how to figure it out for yourself:
Start with Mystro’s CPM calculator as your absolute minimum. You’ll hopefully get offers above that minimum, so you actually get profit (and cover your deadhead miles), but it’s the absolute hard cutoff that you start at.
Then, over time, get a feel for what the $/mi usually is in the offers you take and drive (ignoring the ones you reject). If this is already too low, skip to step 5, and then come back to step 3 once you’ve done some more driving.
Finally, after 100-200 trips or so, check Mystro’s history of your ‘online’ $/mi (which includes all the miles you drove while online with Mystro but not on a trip) as your actual overall $/mi earnings.
Compare those overall $/mi earnings (which include dead miles) with your original CPM. (If you didn’t have Mystro online for those dead miles, you’ll have to math them in manually. So it might be worth leaving Mystro on until you get home.)
If you aren’t getting enough profit per mile, slowly bump up your $/mi filters to be more selective, until you're so selective that your total earnings start to drop.
If you can’t find that sweet spot that keeps both your total earnings and your profit per mile at levels high enough for you? Then this isn’t a source of income for you; it’s a trap. The offer density is just too low. Find better offer density (drive into town or at better times of day) or find other income.
But what about $/hr?
In a low offer density setting, your $/hr filter is less about getting the cream off the top and instead more about trimming the fat off the bottom. Instead of aiming for a high $/hr, since you probably won’t get it, you avoid the low $/hr ones that are so low you refuse to do them. If a high $/hr trip comes along, great, but they’re too rare to do only those offers.
If you really want a higher $/hr, you have to sacrifice one of these three things:
Your free time: Run Mystro around the clock, go about your day, and drop everything when a great offer lands. It works for some drivers, but it's a lifestyle, not a shift.
Your driving area: Drive into a denser market, work a full shift, and drive back. Just make sure you earn enough to cover the deadhead there and back. This works for some drivers, too.
Your total earnings: Stay local, drive only when you want to, and take only the high $/hr offers that show up in your window. But you'll do far fewer trips, so this works best only for drivers who do this as just a side gig.
How do you avoid getting stranded after a drop-off?
Even if you’re out in a suburban or rural area, there’s still going to be shades of degrees of areas that are more dead than others, especially at certain times of day or day of the week.
You can start with Mystro’s heatmaps and learn where the dead zones are through those maps and/or your own experience over time.
In very rural country though, where everywhere’s a dead zone, then your ‘dead zone’ may simply just be “too far from home.”
Mapping out drop-off zone filters in Mystro helps you quickly accept, reject, or identify offers based on whether they're in or out of them.
You can draw these zones any way you like; you have free rein. For instance, an airport, even if it’s a little further from home, can often be worth dropping people off at because of the higher rates and likelihood of trips.
It’s best to start very loose, then tighten the zones only as needed.
Uber and Lyft tools to get home from a dead zone
Let’s say you accepted a ride out into the country, maybe even a profitable one. You planned ahead and your deadhead miles home are already covered from the profit you just made. (Or more likely, they aren’t.)
But either way. You’re staring at a lot of deadhead miles to get back home. Why close yourself off to the possibility of another trip? They’re rare, but why not?
This is where the destination mode filters in the gig platforms can help you out. They keep you from going further away from your staging area (which, in the country, is probably just your home).
Your Mystro zone filters already screen for direction, so the main benefit here is fewer off-direction offers to decline, which helps your acceptance rate (AR) a little. Uber's Destination Mode and Lyft's Head to destination filter tell each platform where you're headed, so it sends you offers going that way.
Know the rules before you rely on them:
Uber limits how many times a day you can use Destination Mode (check your app for your number). You can decline or cancel two exclusive offers on Faster route, or three on Flexible route, before your session ends. Each one still counts against your acceptance rate.
Lyft doesn't protect your acceptance rate while a location filter is on. Declines still count. It also takes you offline automatically if you go 30 minutes without a request, which can happen fast out in the country.
With offers so scarce in the countryside, you probably have plenty of enough time to pull over and activate each platform’s mode. However, if you do get lucky enough to catch a trip and you go offline with the other platforms while you make that trip, that may ‘use up’ one of your ‘uses’ for the day for their mode, so keep that in mind.
Why multi-apping matters more in low-density markets
Multi-apping helps anywhere, but it matters most where offers are scarce. Every app you're not running is offer density you're leaving on the table.
If Lyft sends you one offer an hour, adding Uber, DoorDash, and Instacart can turn that into several. You still get to pick. You're just picking from a bigger pile. And in some small towns, delivery apps stay busier than rideshare, so don't write off a platform before you've tested it in your area.
Running every app you can at once is one of the easiest ways to add density without driving anywhere.
A starter suburban setup and how to adjust it
First, here’s a recap/overview of the filters to put in Mystro.
Mystro checks every offer in this order:
Accept filters: If an offer meets all of them, Mystro accepts it and stops there. Reject filters never run.
Reject filters: If an offer meets any of them, Mystro rejects it.
Manual review: Everything else is yours to decide, with the reasons it didn't auto-accept highlighted. If you don't respond, the offer is declined.
This order has a catch. A reject filter only works if a matching accept filter leaves room for it. Say you draw a reject zone but no accept zone. Offers that drop off in your reject zone will still get auto-accepted if they meet your other accept filters, because the reject step never runs.
Generally speaking, you will want to ‘pair’ each of your reject filters with a matching accept filter.
Recommended Filters for Suburban, Rural, or Low Offer Density
Filter | Step 1: Auto-Accept if ALL of the following | Step 2: Auto-Reject if ANY of the following (only if it passes first step) | Step 3: Manual review (only if it passes first two steps) |
|---|---|---|---|
Pickup Time | Under 30 mins | No filter | Long pickups |
$/mi | Start at CPM Tweak higher if online $/mi is low Tweak lower if total earnings are low | Never go below CPM Tweak higher if online $/mi (+ offline miles) is too low | If the same setting for accept and reject, no manual review occurs. Otherwise, any $/mi between the two values |
Dropoff Location Zone | Define a zone that (if all else is accepted), you want to auto-accept trips if they drop off in this zone | Define a zone that (no matter what the offer also has, like perhaps high pay), you never want to see trips if they drop off in this zone | Anything that’s between the two zones. |
$/hr | Above your personal ‘minimum wage’ that you refuse to work for less than. | Below your personal ‘minimum wage’ that you refuse to work for less than. | Any $/hr between the two values (or exactly the same as either) |
Trip Time | Under 40 minutes (tweak to preference) | No filter | Long trips |
Other filters may be added to your preference, keeping in mind that the more restrictive you are (especially in the reject settings), the less trips you will complete.
Once you have your filters set up, start driving and pay attention to a few things:
How many dead miles do you wind up getting? Especially when comparing different areas. (This may cause you to tweak your zone filters).
What’s the average or most common $/mi offers you wind up getting? Or accepting/completing? (This will help inform where you set your $/mi filters.)
After doing some driving, what’s your ‘online’ $/mi earnings? (This will also help inform your $/mi filters.)
Keep an eye on your dead miles (and the zones most likely to create them) and those $/mi earnings (making sure to factor in the dead miles). Once you have that part of the puzzle on lock, then you can focus on expanding your profits in other ways as far as your rural area allows.
Got a filter trick that works in your market? Hit reply and tell us.
This post first appeared in The Mystro Newsletter — driver tips, earnings strategies, and Mystro updates, in your inbox every week.